Farewell

My oldest daughter LOVES to read. I actually call her Rory (Gilmore Girls reference) sometimes. We have had the same conversation Lorelei and Rory had regarding things not fitting into a backpack because of multiple books. To say my daughter reads a lot is an understatement. She would love nothing more than to spend a day curled up and reading a book! She is in eighth grade this year. She has had two librarians in her life thus far and she has taken a shine to both.

IMG_2007

In the next few weeks our middle school/ town librarian will be embarking a new adventure with her family in another state. We are sad to see her go, but we wish her all the best! She has picked out numerous books for Kailee, as I am sure she does for many folks in our town and school!! Kailee loves that Audrey will search for just the right book for her, or be able to come up with a title at ease that fits just her style. Thank you Audrey for making our children feel special, and for knowing just what book to pick! The next librarian has some big shoes to fill – I hope they welcome the challenge and our kids with “open books.”

As a token of appreciation I made some chocolate cups for her. I mean, who doesn’t love to each chocolates while they read?!?

IMG_2006
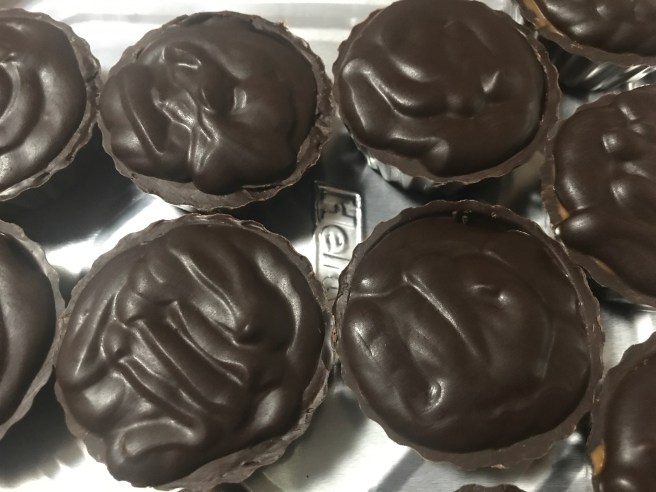
You can make the chocolate cups with a candy mold and tempered or compound chocolate, OR you can buy ready made ones at your local grocery store. I filled them with Biscoff Cookie Butter Smooth Spread and topped with dark chocolate ganache.

IMG_2005
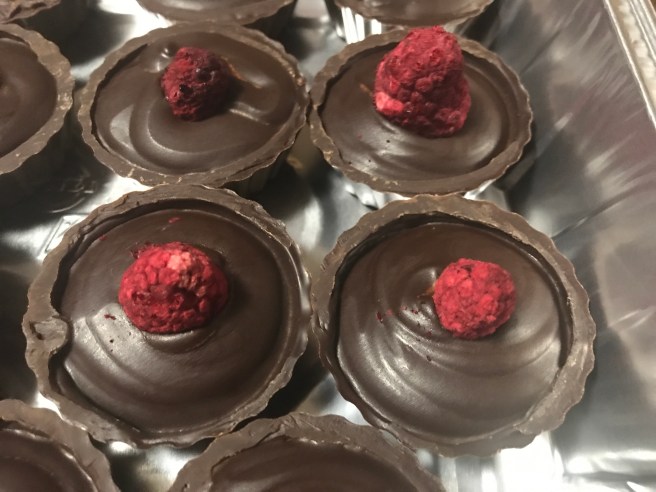
I also made ones that I filled with just the ganache and topped with a freeze dried raspberry.  I used my go-to ganache recipe.

These are super easy and quick to make because you don’t have to let the ganache sit before using it, as you might if you were piping or frosting a dessert, especially if using store bought chocolate candy shells. You fill them and are ready to enjoy!

The possibilities are endless – get creative!! These are a quick treat with big flavor!


Sh*t Happens

Let’s face it. Sometimes we just need a good laugh. It can be cathartic and good for the soul.

I was scrolling through Facebook late at night a few days ago and saw a video from Hungry Happening’s for Poop Emoji Fudge. I knew I had to make them.

Not only because they are so stinkin’ cute, but because the way life has handed me one shit show after another recently – I needed to laugh or cry. I decided to laugh, and laugh I did!

I doubled the recipe and brought these cute little turds to work to share the laughter. We all need to lighten up once in awhile and be silly, carefree and childish. I can think of no better way to do this then POOP EMOJI FUDGE!!

Ingredients:
1 jar of dulce du leche (I found mine at Shaw’s near the jams and jellies)
1 1/2 bags of semi sweet chocolate chips
White Candy Melts
Candy sugar eyes

img_2722Directions:
In a medium sauce pan over low heat melt the dulce de leche and chocolate chips until smooth. While keeping an eye on saucepan, cut the Candy Melts in half to use for the mouths. Carefully spoon mixture into a piping bag that is fitted with a large round tip. Pipe in a swirling motion onto parchment paper. Add eyes and 1/2 a white Candy Melt to make face. I found it best to do these in batches. Once I had used what was in my piping bag, I added the eyes and mouth. Then went back for more of them mixture and repeated. This way, the eyes and mouth would stay on as the fudge sets quite quickly once it is piped out.

Adult Gummies

If you are ever stumped on a quick, easy and stunning DIY gift for friends or family, have I got the solution for you – WINE GUMMIES!

16174630_610040849202947_8720553889943144396_nNow, in all honesty, you can make these gummies with any drink you choose. I used a pink moscato for my trial batch. Next will probably be a prosecco batch. You can also use any silicone mold shape to fit your occasion, and you can use candy flavoring to give your gummies a punch. Many recipes I found online include a Sparkling Wine candy flavoring – which you can order via online.

16142884_610053099201722_1710798348249301483_nIngredients:
1 c. Wine or drink of choice
1/2 c. sugar
6 packets of gelatin
1 drop food coloring (optional)
1 dram candy oil flavoring (optional)

16265821_610056119201420_7831798085563844279_nDirections:
In a medium saucepan over low heat wine and sugar until the sugar is dissolved. Add in food coloring and candy oil and stir until combined. Add in 1 packet of gelatin at a time and stir to combine. Do not let the mixture boil if you want to keep some alcohol content in the gummies. Pour into a spouted measuring cup and pour gently into silicone molds. Place in fridge for 30 minutes to set.

16266353_610054185868280_1082385457873494378_nKeep in mind:
– 5 packets of gelatin will make less chewy gummies
– Lots of stirring creates bubbles/foam on top – spoon off mixture before pouring into molds to create clear gummies
– Mixture sets fast so you need to work quickly
– Keep refrigerated


It’s all in the details …

I had the pleasure of creating two cakes for a logo dessert auction a few weeks ago. I decided to have one presented from my blog and one in coordination with my blog and my place of employment. One of our core values is Community – what better way than to demonstrate this than to participate in the auction.

15095069_574277656112600_5298245113177960289_n
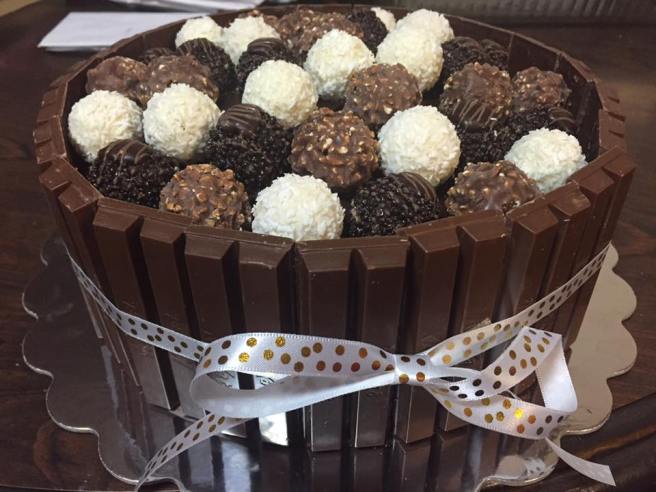
I knew when I decided to participate in the auction that I would make a candy cake – as those are always a big hit – I mean come on … who doesn’t love them some candy! The second cake I decided on the “Lumberjack Cake,” which has not only taken the internet by storm, but also has been tagged with my name on Facebook many times by friends and family. I decided to forgo the axe and use simple ribbon to accent this great looking cake.

15085701_574316222775410_4655919799120926257_nFor those who are not familiar with the “Lumberjack Cake” it is a red and black checkered cake to simulate plaid and the outside looks like a tree stump. For obvious reasons, I didn’t cut into the cake to see the checkered effect, but I will be making another one in the very near future just so I can cut it open and see it!

It amazed me how many compliments I received on these cakes by coworkers and friends after I had posted photos online of the cakes, and it’s all in the details! Simple details!

For the candy cake, I made a chocolate cake and frosted it with a chocolate buttercream. I then used King Sized Kit-Kats to wrap around the cake. I broke them into two segment pieces and placed them side-by-side with the flat side toward the buttercream. Once they were set, I wrapped a ribbon around and tied it tightly to ensure the Kit-Kats stayed upright! Then I simply placed the GIGANTIC Hershey Kiss on top and proceeded to place candy around it. I did use scissors  to open each candy bar and push down the wrapper so that I could stick the candy bar into the cake to keep it upright. I filled in the open spaces with M&Ms. The baking and cooling time were the longest parts of putting this cake together! This type of cake is a visual crowd pleaser. Kids go nuts for it (I think because they think they get to eat all the candy!). I don’t necessarily think that anyone would eat the cake AND all the candy on this cake – no judgement if you do! – however, I look at this similar to fondant. Does anyone actually eat the fondant and/or all the details made from fondant?

For the “Lumberjack Cake” I made a vanilla cake colored red, maroon and black, and I used my Wilton Checkerboard pan set. I colored my same chocolate buttercream black and used that to put between the three layers of cake and then used the plain chocolate buttercream to frost the rest of the cake. I used Giant Sized Hershey bars to make the “bark” on this cake. I simply held the bar up to the cake to measure how much needed to be removed and cut it off. I then used large end of a piping tip to “chop” up the end to make it look uneven and broken. To make the grooved marks to simulate bark I took a writing piping tip and simply drew lines up and down and sideways onto the flat side of the candy bar. I put the Hershey side towards the buttercream. To give it a little depth and dimension a dipped a piece of parchment into some white candy melts and gently wiped it over the grooved marks. Once all the pieces were done, I wrapped the cake in them and secured the bottom with a ribbon. For the top, to simulate rings – I just darkened my chocolate buttercream with a little more chocolate ganache and piped circles on the top and used an offset spatula to smear it all together – turing the cake as I held the spatula to the buttercream.

Two impressive cakes, that honestly didn’t take me long at all once I had figured out what I was going to do! It’s all in details for these two cakes, and those details were easily done.


Biscoff Fudge + Mini Chocolate Chips = Cookie Dough Fudge

Sometimes I get ideas and unintentionally they morph into to something fantabulous. Last night was one of these times. I had a few jars of Biscoff Cookie Spread in my cupboard itching to turn into something tasty. I was sitting a work dreaming of what I could whip up when I got home and it hit me — FUDGE! Why have I not tried making Biscoff fudge before??!! So it started. I love eating a spoonful of Biscoff with a few chocolate chips studded through it so I figured, why not throw in my half bag of mini chocolate chips into the fudge and behold – I made a fudge that tastes EXACTLY like raw cookie dough. EUREKA! This stuff is addicting.

This recipe can easily be doubled or tripled to suit your sweet tooth needs. This would also be a great substitute for a holiday plate instead of peanut butter fudge (even if you chose not to add the chocolate chips!).

INGREDIENTS:
12 oz. white chocolate chips
1 can sweetened condensed milk
2 tbsp. unsalted butter
3/4 jar Biscoff Cookie Spread
1 cup powder sugar, sifted (this matters!)
3-5 oz. mini chocolate chips (optional)

img_1789DIRECTIONS:
Line a 11 x 7 pan with parchment (this will save you a lot of work). In a large and heavy saucepan combined white the first four ingredients. Melt over medium heat. Make sure to stir constantly and get the bottom of the pan while stirring. It only takes a few minutes for this to burn due to the high sugar content. Once the mixture is melted and smooth, remove from heat and stir in sifted powdered sugar (if you don’t sift it you risk having lumps of pure powdered sugar studding your fudge – no good). After this is fully combined work quickly if you are adding the chocolate chips, which will melt and swirl through the fudge. Pour into prepared pan and cool at room temp until set. Cut and ENJOY!

You can choose to pour the chocolate chips over the top after it has been poured into the pan, or you can used chunky Biscoff spread, or crumbled Biscoff cookies, Heath Toffee Bits … the add-in possibilities are ENDLESS!

Crack is Whack!

14330005_541525546054478_6368766877253801155_nMost people associate this recipe with the holidays. Actually, I feel that a lot of people associate homemade baked goods with the holidays in general. Whether it be that holidays are special so people make homemade treats to spoil their loved ones or that we take a little more time around the holidays to do special things – like bake from scratch. This recipe is definitely in the top 15 of “What My Grandma Use To Make.”

This is a spin on “Christmas Crack” that uses saltines and sometimes nuts. This version uses honey graham crackers and toffee bits, along with the traditional butter, brown sugar and chocolate chips.

I stumbled across this version when the other half of my baking brain posted it on Twitter,14322483_541525449387821_271727704957805018_n and am I ever glad I did! This is such a quick and easy recipe. Six ingredients for this version – S-I-X! This and the fact that I almost always have these items in the house make it deadly, but I know how addicting it is … so I most likely share it each time I make it.

Speaking of sharing … this would be a perfect item to bring to a cookie swap or to make as part of a goodie platter. DO IT! You won’t regret it … unless you eat most of it, then you might!

Click here for the recipe from the original source.

For others enJOYment!

I was blessed these past few weeks by friends. I was asked by three people to created sweet treats for them to pass on to others. First it was Finding Dory cupcakes for a friend’s sweet daughter’s birthday party, then a celebratory cake for a local business celebrating 68 years in business and then a birthday cake for a husband for his 30th!

It is honestly the little things in life that I feel give back the most joy! I was honored and flattered that people took time to find me and ask me to make these fun treats!

IMG_1315First it was a red, white and blue swirled vanilla cake frosted with a simple vanilla buttercream, decked out with a fondant and buttercream logo.

14051729_528527370687629_7659439784929021999_n


14051757_529241247282908_4703062274308682897_nSecond was 24 Finding Dory cupcakes – 12 chocolate, 12 vanilla, frosted with vanilla buttercream, topped with cute candy decorations (Pop Rocks, Starburst coral and fondant seaweed, and sticker characters from the movie.

14089098_532174600322906_2598572795207425712_nThird was a chocolate and peanut butter explosion cake! Chocolate cake frosted with peanut butter buttercream topped with chocolate ganache and chopped up peanut butter cups.

I was asked recently if I get joy out of baking simply for the act of baking or do I get joy out of the happiness it brings to others. It’s both. I love how I can get lost in baking like I can in a good book. It clears my head, sets my soul at ease and brings my heart all kinds of happiness. I also love the look on someones face as they bite into something I have made them that makes their taste buds do a happy dance. So if you are having a bad day do what brings you joy!

$74 OH MY!

My 12-year-old daughter tried out for a part in her middle school’s drama production of “Hee Haw Hayride.” She didn’t get the part she auditioned for … she ended up receiving a part with twice as many lines – not bad for a first timer! She, along with all her cast mates, did an amazing job. They worked extremely hard for a month and a half and pulled of a fantastic show.

Our schools drama is funded by donations, concession sales during the plays two-night run and from the dessert auction at the end of each night. I decided to make a candy cake for each night – one vanilla and one chocolate.

The first one I made vanilla cake with white chocolate ganache between the two layers and frosted it with vanilla buttercream. I cut down stick of rock candy that I purchased from our locally owned candy shop, Specialty Sweets, and placed them around the edges of the cake and topped it with Skittles. To keep the rock candy in place I tied a ribbon around the cake for functionality and decoration. This cake sold to one of my daughter’s friends. For the second one I made a chocolate cake with semi-sweet chocolate ganache between the two layers and frosted it with a chocolate buttercream. I then placed Kit-Kats around the edges and topped it with M&Ms. To keep the Kit-Kats in place I again tied a ribbon around the cake. In total, these two cakes sold for $74!

I know a lot of people may think this is too much candy and who would eat all that, or that it is wasteful, however the same can be said for fondant. I DETEST FONDANT! I personally think it tastes gross, and for many cakes it is used for the aesthetics it brings to the cake, not for it’s flavor. The same goes for these cakes – the candy is mostly for decoration and to make the cake stand out. If it all gets eaten, great! Just have a gallon of milk ready!

These candy cakes are great for parties and the possibilities are endless. You can wrap the cake in Pepperidge Farm Pirouettes, Kit-Kats, Snickers, rock candy, jelly beans, ANYTHING! The same goes for the toppings! Fruit, chocolate covered strawberries, jelly beans, Lindor truffles, Ferrero Rocher … get your Willy Wonka on … Pure Imagination!

Chocolate EXPLOSION!

When I ask someone what sweet they want I will usually take their idea and expand on it to make it slightly more decadent. I don’t necessarily do this on purpose, but I mean come on, if you are going to stuff your face, why not make it an AMAZING FACE STUFFING EXPERIENCE? It really seems like a no brainer.

That being said, when I asked Pattie what she wanted as her going away sweet, she responded with, “Something chocolate.” In my mind I heard so much chocolate that my mouth will explode. So that is what I created.

A chocolate cake with chocolate ganache between the two layers, frosted with chocolate buttercream, surrounded in Kit Kats, topped with more chocolate ganache and Ferrero Rochers. Oh yeah, and a ribbon – because it’s much prettier that way (and keeps the Kit Kats from falling off en route).

Good luck Pattie! You will be missed, but I am sure we will see your smiling face in the office often!

12801327_459053664301667_6973519095904911384_n