Saying Thank You With Brownies!

Sometimes you need a little more than words to say thank you and these brownies are just the way to do it!

I am obsessed with gooey fudgy brownies and the espresso in this recipe gives a nice kick and make the chocolate sing! If you are a cake brownie fan this is not the recipe for you. Did I mention you only need one pot to make these? One pot, a whisk and an 8×8 baking dish!

INGREDIENTS:
1½ sticks unsalted butter
1 c. brown sugar
¾ c. white sugar
3 lg. eggs
1 lg. egg yolk
2 tsp. vanilla
1 c. dark chocolate cocoa powder
c. AP flour
2 tsp. espresso powder
Pinch of salt
½ c. dark chocolate chips

DIRECTIONS:
Preheat the oven to 350 degrees. Line an 8 x 8 inch baking dish with parchment & grease. In med. sauce pan melt butter over medium heat. Remove from heat & whisk in brown & white sugar until smooth. Add eggs & egg yolk one at a time, whisking well after each addition. Stir in the vanilla. Add in cocoa powder, flour, espresso powder & salt. Stir until just combined. Stir in chocolate chips. Pour the mixture into the prepared pan and bake for 40-45 minutes. These are decedent dark chocolate goodness and just try not to eat more than one!

Good Luck, Charlie!

Sometimes people come into your life and you don’t realize the impact they have. Today marks one week that a very special employee retired from our company. I was asked to make the desserts for his party and I jumped at the opportunity. I was flattered that they asked, but more so, I was thrilled to do this to show him how much he truly means to all of us. I have stated before and I will state it again – baking is how many of us show and share love with the people around us. WE ALL LOVE CHARLIE and he so deserved the kind words, the endless recognition and to eat LOTS OF CAKE!

13516186_507226809484352_2417428643004849372_n
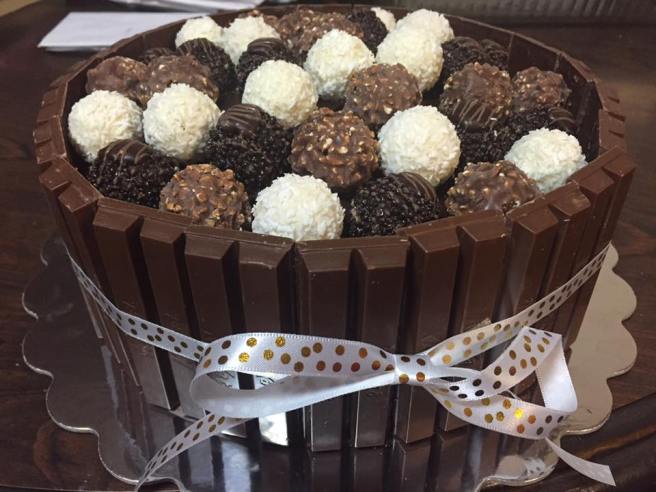
So I went to work making enough cake and cupcakes to feed a small army. I decided on keeping the cake flavors simple, but to go slightly crazy on the frostings!

13507152_507226762817690_2884251503118510521_nI made 84 cupcakes (not all shown) and one double 13×9 cake. The cake was chocolate cake with peanut butter frosting and filled with chocolate ganache and decorated with PB cups and a printed sugar sheet (thanks Callie and Frank’s Bakery!)

13524454_507226776151022_8454461130550016230_nThe cupcakes were chocolate cake either frosted with marshmallow buttercream, espresso buttercream or chocolate ganache buttercream, and vanilla cake frosted with either peanut butter frosting, chocolate ganache buttercream, vanilla buttercream or filled with key lime curd and topped with marshmallow buttercream.

They all came out great! Everyone enjoyed them and I had a blast piping all the frostings in different styles with different tips.

Salty & Sweet!

CHAOS! A hamster running on a wheel going over and over the same information. It can be something small that just gets stuck in my head and even though the rational part of me knows that between the hours of 11 p.m. and 3 a.m. nothing can be solved (usually), but I still dwell. The remedy usually comes in the form of using my hands to create a delicious treat. It soothes my soul, quiets my mind and gives me peace – even if just for a few hours.

I knew this week that I had been craving something salty and sweet – not just salted caramel, but I wanted MORE! Since I already had pretzels and kettle corn, and chocolate, heavy cream, caramels, sweetened condensed milk, butter and more – I knew I could bang out a batch of cupcakes in no time. The creative team at my work has been slammed the past few weeks. They bust their asses on a daily basis and are asked for more favors than most people I know in our work place – they deserve the enjoy my salty and sweet treats!

For these cupcakes I made a basic chocolate cupcakes from Betty Crocker, only I made them with dark chocolate cocoa powder. You can also use a box mix – THERE IS NO SHAME IN CHEATING WHEN IT COMES TO BAKING/COOKING! I filled them with a basic and quick salted caramel (consisting of melting 2 bags of Werther’s soft caramels and 1 can of sweetened condensed milk, and adding crushed sea salt to taste) and topped them with chocolate ganache (1 bag of dark chocolate chips and 1 sm. container of heavy cream – melted until smooth. I let this batch of ganache sit in the fridge to cool and whipped just before it set so it had the consistency of mousse rather than frosting). Then came the fun part – I broke up a few small pretzels to top half and opened a bag of Smartfood Kettle Corn mini bag to top the other half.

Sometimes it is the littlest and easiest detail that really makes things look like you slaved FOREVER on something that really took less than an hour. Google Images can provide you some great ideas! Put in something simple  – chocolate and caramel or brownies and cookie spread or fruit and chocolate. Skim through the images and see what catches your eye! A lot of times things only look detail or hard – don’t just a book by it’s cover. Don’t just overlook something because you think it my take too long or be too hard – you just never know what you might be missing!


$74 OH MY!

My 12-year-old daughter tried out for a part in her middle school’s drama production of “Hee Haw Hayride.” She didn’t get the part she auditioned for … she ended up receiving a part with twice as many lines – not bad for a first timer! She, along with all her cast mates, did an amazing job. They worked extremely hard for a month and a half and pulled of a fantastic show.

Our schools drama is funded by donations, concession sales during the plays two-night run and from the dessert auction at the end of each night. I decided to make a candy cake for each night – one vanilla and one chocolate.

The first one I made vanilla cake with white chocolate ganache between the two layers and frosted it with vanilla buttercream. I cut down stick of rock candy that I purchased from our locally owned candy shop, Specialty Sweets, and placed them around the edges of the cake and topped it with Skittles. To keep the rock candy in place I tied a ribbon around the cake for functionality and decoration. This cake sold to one of my daughter’s friends. For the second one I made a chocolate cake with semi-sweet chocolate ganache between the two layers and frosted it with a chocolate buttercream. I then placed Kit-Kats around the edges and topped it with M&Ms. To keep the Kit-Kats in place I again tied a ribbon around the cake. In total, these two cakes sold for $74!

I know a lot of people may think this is too much candy and who would eat all that, or that it is wasteful, however the same can be said for fondant. I DETEST FONDANT! I personally think it tastes gross, and for many cakes it is used for the aesthetics it brings to the cake, not for it’s flavor. The same goes for these cakes – the candy is mostly for decoration and to make the cake stand out. If it all gets eaten, great! Just have a gallon of milk ready!

These candy cakes are great for parties and the possibilities are endless. You can wrap the cake in Pepperidge Farm Pirouettes, Kit-Kats, Snickers, rock candy, jelly beans, ANYTHING! The same goes for the toppings! Fruit, chocolate covered strawberries, jelly beans, Lindor truffles, Ferrero Rocher … get your Willy Wonka on … Pure Imagination!

THREE INGREDIENTS!

Whomever thought to crush cookies to make them in to fake truffles is a genius! I mean come on! Three ingredients and the short time of creating such deliciousness can’t be beat!

I may have gone a little over board on buying Girl Scout cookies this year. Who am I fooling .. I do it EVERY year! I tell myself that I am just being helpful and kind by buying so many, but really I just love me some Thin Mints and Carmel de lites (formerly known as Samoas). So of course I receive 3/4 of the boxes I have ordered and decide it is time to go on a diet because I obviously love to punish myself and make dieting even more hard than it already is!

I used one box of Thin Mints to top some delicious brownies that I slathered in chocolate ganache for a get-together at a friends house a few weeks ago. Then it was an co-workers birthday, so I decided to finish of my supply of Thin Mints to make Thin Mint Truffles – you can also make these with Oreos, which I believe this idea started (don’t quote me on it though). I added some peppermint extract to my melted chocolate just to give it a little kick – so my truffles actually had four ingredients, but who’s counting!

Ingredients:
2 sleeves Thin Mints
4 oz. softened cream cheese
8 oz. melted chocolate chips or candy melts

Directions:
In food processor add Thin Mints and pulse until fine crumbed. Add in softened cream cheese and pulse until crumbs and cream cheese form a “dough” consistency. Line small sheet tray or plate with parchment paper. Scoop dough out with a teaspoon and roll between your palms into a small ball. Once all dough is formed into balls place in fridge to chill. While balls are firming in the fridge, pour chocolate chips or candy melts into a microwave safe bowl and heat in 2 or 3 – 30 second intervals stirring well between sessions so that you don’t burn the chocolate or candy melts. Also, by stirring throughly you are spreading the heat around which will help melt more chocolate. You don’t want to melt the chocolate completely using the microwave or the chocolate will become too hot and not set correctly. You want the chocolate to be about room temp. – this is “faking” tempering chocolate so that it will set at room temp. Once the chocolate is ready (this is where I added the peppermint extract and stirred it through), remove your truffles from the fridge and start rolling one-by-one to coat. Set back on parchment paper and let set up at room temp – or at least try to – before eating.

ENJOY!

Chocolate EXPLOSION!

When I ask someone what sweet they want I will usually take their idea and expand on it to make it slightly more decadent. I don’t necessarily do this on purpose, but I mean come on, if you are going to stuff your face, why not make it an AMAZING FACE STUFFING EXPERIENCE? It really seems like a no brainer.

That being said, when I asked Pattie what she wanted as her going away sweet, she responded with, “Something chocolate.” In my mind I heard so much chocolate that my mouth will explode. So that is what I created.

A chocolate cake with chocolate ganache between the two layers, frosted with chocolate buttercream, surrounded in Kit Kats, topped with more chocolate ganache and Ferrero Rochers. Oh yeah, and a ribbon – because it’s much prettier that way (and keeps the Kit Kats from falling off en route).

Good luck Pattie! You will be missed, but I am sure we will see your smiling face in the office often!

12801327_459053664301667_6973519095904911384_n

Cookie Spread!

IMG_1803I have found two types of people – people who go gaga over cookie spread and those who look at you with a blank stare because they have never heard of it (I know what you’re thinking … how can someone not know what it is!?!). Regardless of which category you fall into it, I have found a recipe to feed your addiction or to start one!

My daughter was home sick on Monday with a stomach virus that has been running amok in our school. She was laying on the couch curled up in a ball watching a movie. I had already done the dishes, tidy up the house, vacuumed and taken down the Christmas tree – don’t judge. Side note: having a fake tree enables me to keep it up longer. I don’t apologize for this by any means … I love to decorate my tree to make it look pretty and the lights on at night is just too pretty to only have up for a few days.  So since I had exhausted my ideas to entertain myself while my daughter was sick I decided to make brownies. I felt slightly bad about this since I knew she couldn’t eat any of the brownies I was going to make, but assured her I wouldn’t bring them to work so that she could enjoy them when she was feeling better.

I had some extra Biscoff spread from Christmas treats that I had been saving for just the right recipe. So I turned to my good friend Google and searched Biscoff spread brownies. There were a ton of different recipes. Blondies made with the spread incorporated, brownies with a Biscoff spread frosting, layered brownies, the list goes on and on, but one photo caught my eye! http://www.biscoff.com/create/recipes/195/fudgy-biscoff-swirl-brownies

Oh my goodness! AMAZING! The brownies are thick and fudge – and moist! The swirled spread on top pushes this one over the edge into a you can’t just stop at one even though they are decedent and delicious! You will not regret trying this recipe!

Grateful

Chocolate on Chocolate cupcake

My birthday is just around the corner. I honestly don’t keep track of how old I am anymore, but I do know how old the girl’s dad is – so I subtract one from his age and voila, that’s my age. Birthdays seemed to stop being such a big deal for me after high school and then reappeared with importance once the girls were old enough to realize what birthdays are.

During high school birthdays were huge. We had a store near our high school that sold fun decorating items for all types of celebrations. We use to go and buy wired ribbon with stars dangling off and other accessories to make crowns for whomever’s birthday it was. Someone usually brought in some type of sweet too and lunchtime was turned into a mini party for you and your group.

Just like my mom did for me growing up, I now do for my daughters. They get to pick their sweet treat for school to celebrate their birthdays with their classroom. We are very thankful and lucky that our daycare is in a private home, and she always makes sure to make something special for after school snack as well.

Our children are definitely spoiled when it comes to birthday celebrations, but you know what? They so deserve it. Every other year the girls get to have a big birthday party with friends. The off years for those types of parties are full on family fun. The girls pick their dinner and birthday cake concoction. We have family come over for it and hang out. Ever since Kailee was four we have taken her to a show at the local theater for her birthday. We make it a little family event. The girls dress up, we go out to dinner and a show. These are some of my favorite memories, and theirs too.

My kids are amazing and I don’t just say that as a biased mom. I never realized how strict we seemed to be with our kids until they got to be school aged, but in a good way. They have respect for adults, their peers and each other. They are very kind-hearted and caring individuals with tons of love to share. We are constantly told how well-behaved our children are when they go to friends houses or from their teachers.

I am a firm believer that structure and discipline help children thrive to be the best they can be. My kids are examples of this. They love each other very much and are each others best friend. They are very caring little people who want to do good and see the good in this world. They make us proud each and everyday. They are amazingly beautiful inside and out. For this, and so much more, I am extremely grateful.

Chocolate Buttercream Frosting (MY FAVORITE)
6 tbsp. softened unsalted butter
2 2/3 c. confectioners sugar
1/2 c. unsweetened cocoa powder
1/3 c. milk
1 tsp. good vanilla

DIRECTIONS: Cream together the butter and sugar, add in cocoa powder, milk and vanilla. Mix until well combined. Keep at room temp. for easy spreading when frosting.

Betty Crocker’s Bonnie Butter Cake (MY FAVORITE)
1 3/4 c. sugar
2/3 c. unsalted butter softened
1 1/2 tsp. good vanilla
2 eggs
2 3/4 c. AP flour
2 1/2 tsp. baking powder
1 tsp. salt
1 1/4 c. milk

DIRECTIONS: Heat oven to 350 degrees. Grease bottom and sides of rectangular pan, 13 x 9 x 2 inches, or 2 round pans, 9 x 1 1/2 inches; lightly flour. Beat sugar, butter/margarine, vanilla and eggs in large bowl with electric mixer on low speed 30 seconds, scraping bowl constantly. Beat on high speed 5 minutes, scraping bowl occasionally. Beat in flour, baking powder and salt alternatively with milk on low speed. Pour into pan(s). Bake for 45 to 50 minutes if using the rectangular pan, 30 to 35 minutes if using the round pans, or until toothpick inserted in center comes out clean. Cool rectangular pan on wire rack. Cool round pans 10 minutes; remove to wire rack. Cool completely.  Frost with the above mentioned chocolate buttercream or your favorite frosting and ENJOY! 

Life is sticky, just like caramel.

You can hear the crumble. Bit by bit, piece by piece. The sound echoing within the empty walls … the hollow finally showing it’s depth. During the day it is drowned out by the background noise of daily life. At night, alone in the dark, with nothing but your muffling sobs to drowned it out, the familiar shattering ensues.
It is one thing in life to know something. It is quite another to say it out loud. What makes it truly unbearable and downright full of shame and embarrassment is someone else saying it out loud. This is not the validation you want. This is not what you want to be recognized for or have attention drawn to. Yes, you know it. How can you not? You can “not” by ignoring it and acting as though it doesn’t exist. You have perfected the toddler mentality of if you can’t see it then neither can they. You know this isn’t true, but you still let yourself believe it. You have to in order to make it through. You tell yourself it isn’t that bad. That you can change it if you want to. It will be different this time. This is what has and always will define you, because you let it. Is it comfortable? No. Is it healthy? Hell no, and on so many levels. You know all of this … So does that make it worse? Does it make it worse to be an adult, know you have an issue and with a sound mind refuse to acknowledge it? Or is that the definition of scared? Maybe it is a fine line we walk between scared shitless and ignorance is bliss.
They say knowledge is power, so why after someone else tells you what you have known deep down in that hollow space, that you feel powerless and at your must vulnerable and/or shameful. How did you let it get this far. How did it domino so fast? Maybe you have to be so low you are forced to work up. Maybe you need to be scared so shitless that there really is only one choice … to move forward and to stare into the face of what ails you and tell it to sit down and shut up. The choice is yours and yours alone.

Salted Caramel and Chocolate Ganache Brownies.

Brownies:
Grab your favorite box or recipe (I love Betty Crocker’s brownie recipe https://havesweetswillshare.com/2015/09/03/look-for-the-signs/). Make per the instructions and let cool.

IMG_0988Salted Caramel:
In a large sauce pan combined 1 can sweetened condenced milk and 3 bags of Werther’s Soft Caramels. Stir until all caramels are melted and it is smooth and bubbly. Add 1/4 tsp. fine sea salt and stir until it is distributed. Resisit licking the spoon … the caramel is scalding hot! Pour this mixture on top of your brownies and set in the fridge sans cover to firm up.


IMG_0958Chocolate Ganache:
Keep in mind chocolate ganache (recipe in previous post here) needs to set at room temp. for about 12 hours to become solid and non-melting at room temp. If you make the ganache and pour it immediately over the brownies it will set up in the fridge but become very soft at room temp. I suggest letting the brownie and caramel set in the fridge while the ganache sets at room temp. After 10-12 hours you can beat the ganache with an electric mixer, just to make it spreadable and then slather it on.

Everyone has 10 minutes!

 imageTrifle. A retro hodge-podge of goodness. Think of it as an “everything but the kitchen sink” kind of dessert. You can go elaborate or simple, all homemade, all store bought or a little of each. The mostly store bought or “left over” option can be done in less than 10 minutes!

imageThe trifle I made is layered with homemade whipped cream, Smucker’s Decadent Hot Fudge, Smucker’s Sea-salted Caramel, broken up brownies and Special K fudge covered pretzels.

You can use angel food cake, pound cake, devils food cake or any sturdy cake that can be cubed or broken without being all crumbles OR use your favorite Jell-O flavor made with the Jiggler recipe. Add some fruit or candy pieces or even pudding!! Drizzle on your favorite sauce toppings, add in some homemade whipped cream or Cool Whip and you have a stunning looking, mouth watering, crowd pleasing dessert.

The possibilities are endless and time is precious. Don’t fret when you forget you said you’d bring a dish to a potluck event or your kids class for a party. This dish will look like you slaved over it – even though you didn’t!! The crowd will love it and you didn’t have to break the bank or a sweat to make it; a win-win in my book. ENJOY!